Si vous souhaitez utiliser une base de données depuis PHP sur une Centos 5.x, voilà la procédure à suivre.
On partira du principe que vous avez déjà installé PHP et apache.
Vous devez aussi installer les outils de développement afin de pouvoir compiler PECL:
yum -y groupinstall "development tools"
Sur Centos 5.4 X64, les paquets suivants sont installés:
flex-2.5.4a-41.fc6.x86_64
gcc-4.1.2-48.el5.x86_64
redhat-rpm-config-8.0.45-32.el5.centos.noarch
strace-4.5.18-5.el5_5.5.x86_64
rpm-build-4.4.2.3-20.el5_5.1.x86_64
1:make-3.81-3.el5.x86_64
1:pkgconfig-0.21-2.el5.x86_64
gettext-0.14.6-4.el5.x86_64
gettext-0.14.6-4.el5.i386
automake-1.9.6-2.3.el5.noarch
gdb-7.0.1-23.el5_5.2.x86_64
bison-2.3-2.1.x86_64
libtool-1.5.22-7.el5_4.x86_64
autoconf-2.59-12.noarch
gcc-c++-4.1.2-48.el5.x86_64
binutils-2.17.50.0.6-14.el5.x86_64
ltrace-0.5-13.45svn.el5.x86_64
diffstat-1.41-1.2.3.el5.x86_64
splint-3.1.1-16.el5.x86_64
1:valgrind-3.5.0-1.el5.x86_64
1:valgrind-3.5.0-1.el5.i386
systemtap-1.1-3.el5_5.2.x86_64
subversion-1.4.2-4.el5_3.1.x86_64
subversion-1.4.2-4.el5_3.1.i386
texinfo-4.8-14.el5.x86_64
python-ldap-2.2.0-2.1.x86_64
patchutils-0.2.31-2.2.2.x86_64
byacc-1.9-29.2.2.x86_64
gcc-gfortran-4.1.2-48.el5.x86_64
elfutils-0.137-3.el5.x86_64
rcs-5.7-30.1.x86_64
automake16-1.6.3-8.el5.1.noarch
automake17-1.7.9-7.el5.2.noarch
automake14-1.4p6-13.el5.1.noarch
automake15-1.5-16.el5.2.noarch
ctags-5.6-1.1.x86_64
dogtail-0.6.1-3.el5.noarch
swig-1.3.29-2.el5.x86_64
dev86-0.16.17-2.2.x86_64
1:doxygen-1.4.7-1.1.x86_64
indent-2.2.9-14.fc6.x86_64
cvs-1.11.22-7.el5.x86_64
pstack-1.2-7.2.2.x86_64
oprofile-0.9.4-15.el5.x86_64
cscope-15.5-15.1.el5_3.1.x86_64
Sur le site d’oracle, télécharger les paquets suivants (en RPM):
- oracle-instantclient11.2-basic
- oracle-instantclient11.2-sqlplus (optionnel)
- oracle-instantclient11.2-devel
Installer les paquets fraîchement téléchargés:
rpm -Uvh oracle-instantclient11.2-basic-11.2.0.2.0.x86_64.rpm oracle-instantclient11.2-devel-11.2.0.2.0.x86_64.rpm oracle-instantclient11.2-sqlplus-11.2.0.2.0.x86_64.rpm
Il est nécessaire d’indiquer au système le chemin des nouvelles librairies:
echo "/usr/lib/oracle/11.2/client64/lib/" > /etc/ld.so.conf.d/oracle_lib.conf
ldconfig
Vous pouvez tester votre installation d’oracle en lançant /usr/bin/sqlplus64.
SQL*Plus: Release 11.2.0.2.0 Production on Wed Nov 10 14:41:50 2010
Copyright (c) 1982, 2010, Oracle.  All rights reserved.
Enter user-name:
Ensuite on va installer OCI8 à l’aide de PECL:
Si vous passez par un proxy HTTP, configurez PECL comme suit:
pear config-set http_proxy http://proxy.xxx:3128
Lancez l’installation proprement dite.
pecl install oci8
L’installation se lance. A la question « Please provide the path to the ORACLE_HOME directory. Use ‘instantclient,/path/to/instant/client/lib’ if you’re compiling with Oracle Instant Client [autodetect] :« , donnez le chemin où est installé le client oracle, ici: instantclient,/usr/lib/oracle/11.2/client64/lib
downloading oci8-1.4.3.tgz ...
Starting to download oci8-1.4.3.tgz (153,515 bytes)
............done: 153,515 bytes
10 source files, building
running: phpize
Configuring for:
PHP Api Version:         20041225
Zend Module Api No:      20050922
Zend Extension Api No:   220051025
Please provide the path to the ORACLE_HOME directory. Use 'instantclient,/path/to/instant/client/lib' if you're compiling with Oracle Instant Client [autodetect] : instantclient,/usr/lib/oracle/11.2/client64/lib
building in /var/tmp/pear-build-root/oci8-1.4.3
running: /tmp/tmppNXlUK/oci8-1.4.3/configure --with-oci8=instantclient,/usr/lib/oracle/11.2/client64/lib
checking for egrep... grep -E
checking for a sed that does not truncate output... /bin/sed
checking for gcc... gcc
checking for C compiler default output file name... a.out
checking whether the C compiler works... yes
checking whether we are cross compiling... no
checking for suffix of executables...
checking for suffix of object files... o
checking whether we are using the GNU C compiler... yes
checking whether gcc accepts -g... yes
checking for gcc option to accept ANSI C... none needed
checking whether gcc and cc understand -c and -o together... yes

...
Build complete.
(It is safe to ignore warnings about tempnam and tmpnam).
running: make INSTALL_ROOT="/var/tmp/pear-build-root/install-oci8-1.4.3" install
Installing shared extensions:     /var/tmp/pear-build-root/install-oci8-1.4.3/usr/lib64/php/modules/
running: find "/var/tmp/pear-build-root/install-oci8-1.4.3" -ls
4149348    4 drwxr-xr-x   3 root     root         4096 nov 10 13:38 /var/tmp/pear-build-root/install-oci8-1.4.3
4149377    4 drwxr-xr-x   3 root     root         4096 nov 10 13:38 /var/tmp/pear-build-root/install-oci8-1.4.3/usr
4149378    4 drwxr-xr-x   3 root     root         4096 nov 10 13:38 /var/tmp/pear-build-root/install-oci8-1.4.3/usr/lib64
4149379    4 drwxr-xr-x   3 root     root         4096 nov 10 13:38 /var/tmp/pear-build-root/install-oci8-1.4.3/usr/lib64/php
4149380    4 drwxr-xr-x   2 root     root         4096 nov 10 13:38 /var/tmp/pear-build-root/install-oci8-1.4.3/usr/lib64/php/modules
4149376  476 -rwxr-xr-x   1 root     root       481338 nov 10 13:38 /var/tmp/pear-build-root/install-oci8-1.4.3/usr/lib64/php/modules/oci8.so
Build process completed successfully
Installing '/var/tmp/pear-build-root/install-oci8-1.4.3//usr/lib64/php/modules/oci8.so'
install ok: channel://pecl.php.net/oci8-1.4.3
You should add "extension=oci8.so" to php.ini
Comme indiqué, il faut maintenant configurer php pour utiliser le module OCI8.
echo "extension=oci8.so" > /etc/php.d/oci8.ini
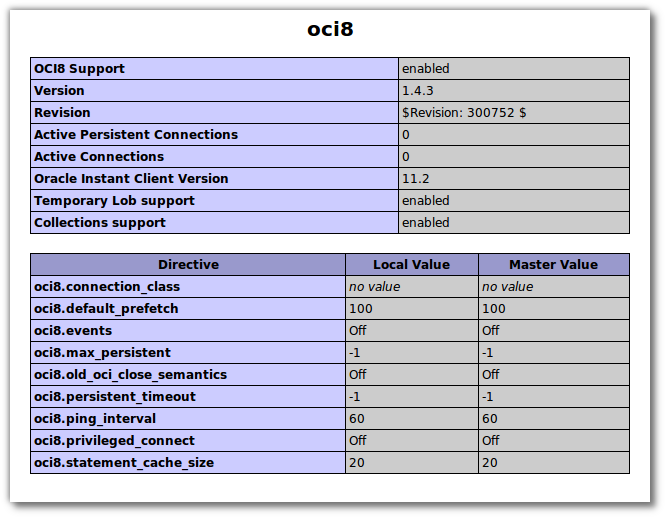
redémarrez apache pour prendre en compte les modifications ( /etc/init.d/httpd restart ) . Vous pouvez vérifier la prise en compte d’OCI en utilisant la fonction PHP phpinfo();

Vous pouvez maintenant profiter d’ORACLE au travers du couple PHP / APACHE.
La doc officielle d’installation d’OCI8 est ici
J’aime ça :
J’aime chargement…


